저번 시리즈에서 png, jpg to Webp 프로그램을 뤼튼을 사용한 ChatGPT4로 제작했었다. 워드프레스를 운영하면서, 직접 찍은 사진에 원하는 사진으로 워터마크를 일괄 삽입하는 프로그램이 없을까 찾아봤는데, 무슨 포토스케이프 라는 프로그램을 깔아야 한다고 한다. 너무 귀찮다. 바로 ChatGPT4에게 코딩을 맡겼다.
워터마크 일괄 삽입 코드
AI가 제작해 준 코드는 아래와 같다. 정말 많은 시행착오가 있었다. 특히 초기에 구상할 때는 무조건 중앙에 위치하도록 만들었었는데, 사진을 정사각형으로 9등분하고, 체크한 부분에 워터마크를 넣는 기능을 넣기 위해 GPT와 많은 대화를 나눴다. 코드에서 12~22행까지가 위치를 나타내는 부분이고, 취향에 맞게 숫자를 수정하면 된다. 첫 번째 나오는 숫자는 가로, 두 번째 나오는 숫자는 세로이다. 원본 사진에서의 위치를 0~1 사이로 나타낸 값이다.
기본값은 워터마크를 중앙에 배치하도록 설정하였다(17열의 e). 프로그램을 열면 e에 체크가 되어있으니 다른 곳에 워터마크를 넣고 싶으면 체크를 추가하면 된다. (체크 여러 개 가능)
1 2 3 4 5 6 7 8 9 10 11 12 13 14 15 16 17 18 19 20 21 22 23 24 25 26 27 28 29 30 31 32 33 34 35 36 37 38 39 40 41 42 43 44 45 46 47 48 49 50 51 52 53 54 55 56 57 58 59 60 61 62 63 64 65 66 67 68 69 70 71 72 73 74 75 76 77 78 79 80 81 82 83 84 85 86 87 88 89 90 91 92 93 94 95 96 97 98 99 100 101 102 103 104 105 106 107 108 109 110 111 112 113 114 115 116 117 118 119 120 121 122 123 124 125 126 127 128 129 130 131 132 133 134 135 136 137 138 139 140 141 142 143 144 145 146 147 148 149 150 151 152 153 154 155 156 157 158 159 160 161 162 163 164 165 166 167 168 169 170 171 172 173 174 175 176 177 178 179 180 181 182 183 184 185 186 187 188 189 190 191 192 193 194 195 196 197 198 199 200 201 202 203 204 205 206 207 208 | from PIL import Image import tkinter as tk from tkinter import messagebox, filedialog, StringVar, Checkbutton, Entry import os # 초기 변수를 설정합니다. output_dir_left = ” output_dir_right = ” file_paths_left = [] file_paths_right = [] watermark_path = ” positions = { ‘a’: (0.2, 0.1), ‘b’: (0.5, 0.1), ‘c’: (0.8, 0.1), ‘d’: (0.2, 0.5), ‘e’: (0.5, 0.5), ‘f’: (0.8, 0.5), ‘g’: (0.2, 0.9), ‘h’: (0.5, 0.9), ‘i’: (0.8, 0.9) } selected_positions = {‘e’} vars = {} # 함수를 정의합니다. def select_files_left(): global file_paths_left file_paths_left = filedialog.askopenfilenames(filetypes=[(‘Image files’, ‘.png .jpeg .jpg’)]) for file_path in file_paths_left: listbox_upload_left.insert(tk.END, os.path.basename(file_path)) def select_files_right(): global file_paths_right file_paths_right = filedialog.askopenfilenames(filetypes=[(‘Image files’, ‘.png .jpeg .jpg’)]) for file_path in file_paths_right: listbox_upload_right.insert(tk.END, os.path.basename(file_path)) def set_output_dir_left(): global output_dir_left output_dir_left = filedialog.askdirectory() dir_var_left.set(f“선택된 저장 경로: {output_dir_left}”) def set_output_dir_right(): global output_dir_right output_dir_right = filedialog.askdirectory() dir_var_right.set(f“선택된 저장 경로: {output_dir_right}”) def select_watermark(): global watermark_path watermark_path = filedialog.askopenfilename(filetypes=[(‘Image files’, ‘.png .jpeg .jpg’)]) watermark_var.set(f“선택된 워터마크 이미지: {os.path.basename(watermark_path)}”) def convert_images(): listbox_converted.delete(0, tk.END) for file_path in file_paths_left: img = Image.open(file_path) converted_file_path = os.path.join(output_dir_left, os.path.basename(file_path).split(‘.’)[0] + ‘.webp’) img.save(converted_file_path, ‘WEBP’) listbox_converted.insert(tk.END, os.path.basename(converted_file_path)) def apply_watermark(): listbox_watermarked.delete(0, tk.END) if not watermark_path: messagebox.showerror(“워터마크 오류”, “워터마크로 사용할 이미지를 먼저 선택해주세요.”) return try: transparency = float(transparency_entry.get()) if not 0 <= transparency <= 1: raise ValueError except ValueError: messagebox.showerror(“투명도 오류”, “0~1 사이의 숫자를 입력해주세요.”) transparency_entry.delete(0, tk.END) transparency_entry.insert(0, “0.85”) return size = int(size_entry.get()) watermark = Image.open(watermark_path).convert(“RGBA”) for file_path in file_paths_right: img = Image.open(file_path).convert(“RGBA”) base_width = img.width // size w_percent = (base_width / float(watermark.size[0])) h_size = int((float(watermark.size[1]) * float(w_percent))) watermark_resized = watermark.resize((base_width, h_size)) for position in selected_positions: watermark_position = watermark_resized.copy() watermark_with_transparency = Image.new(“RGBA”, img.size) for x in range(watermark_position.width): for y in range(watermark_position.height): r, g, b, a = watermark_position.getpixel((x, y)) watermark_position.putpixel((x, y), (r, g, b, int(a * transparency))) x_offset = int(img.width * positions[position][0]) – watermark_position.width // 2 y_offset = int(img.height * positions[position][1]) – watermark_position.height // 2 watermark_with_transparency.paste(watermark_position, (x_offset, y_offset), mask=watermark_position) img = Image.alpha_composite(img, watermark_with_transparency) img.save(os.path.join(output_dir_right, os.path.basename(file_path).split(‘.’)[0] + ‘.png’), ‘PNG’) listbox_watermarked.insert(tk.END, os.path.basename(file_path)) def reset_left(): listbox_upload_left.delete(0, tk.END) listbox_converted.delete(0, tk.END) def reset_right(): listbox_upload_right.delete(0, tk.END) listbox_watermarked.delete(0, tk.END) def toggle_watermark_position(value): if value in selected_positions: selected_positions.remove(value) else: selected_positions.add(value) # GUI를 설정합니다. root = tk.Tk() root.title(‘이미지 변환기’) root.geometry(‘800×800’) root.resizable(True, True) left_frame = tk.Frame(root, borderwidth=2, relief=“solid”) left_frame.pack(side=tk.LEFT, fill=“both”, expand=True) right_frame = tk.Frame(root, borderwidth=2, relief=“solid”) right_frame.pack(side=tk.RIGHT, fill=“both”, expand=True) title_left = tk.Label(left_frame, text=“PNG, JPG to WebP”, font=(“Helvetica”, 16, “bold”), fg=“black”) title_left.pack() select_button_left = tk.Button(left_frame, text=“파일 선택”, command=select_files_left) select_button_left.pack() dir_button_left = tk.Button(left_frame, text=“저장 경로 설정”, command=set_output_dir_left) dir_button_left.pack() convert_button = tk.Button(left_frame, text=“이미지 변환”, command=convert_images) convert_button.pack() reset_button_left = tk.Button(left_frame, text=“초기화”, command=reset_left) reset_button_left.pack() dir_var_left = StringVar() dir_label_left = tk.Label(left_frame, textvariable=dir_var_left) dir_label_left.pack() listbox_upload_left = tk.Listbox(left_frame) listbox_upload_left.pack() tk.Label(left_frame, text=“업로드된 파일 (이미지 변환)”).pack() listbox_converted = tk.Listbox(left_frame) listbox_converted.pack() tk.Label(left_frame, text=“변환된 파일”).pack() title_right = tk.Label(right_frame, text=“워터마크 일괄 삽입”, font=(“Helvetica”, 16, “bold”), fg=“black”) title_right.pack() select_button_right = tk.Button(right_frame, text=“파일 선택”, command=select_files_right) select_button_right.pack() dir_button_right = tk.Button(right_frame, text=“저장 경로 설정”, command=set_output_dir_right) dir_button_right.pack() watermark_button = tk.Button(right_frame, text=“워터마크 이미지 선택”, command=select_watermark) watermark_button.pack() apply_button = tk.Button(right_frame, text=“워터마크 적용”, command=apply_watermark) apply_button.pack() reset_button_right = tk.Button(right_frame, text=“초기화”, command=reset_right) reset_button_right.pack() transparency_label = tk.Label(right_frame, text=“투명도 조절(0~1)”) transparency_label.pack() transparency_entry = Entry(right_frame) transparency_entry.pack() transparency_entry.insert(0, “0.85”) size_label = tk.Label(right_frame, text=“크기 조절(1~10 권장, 원본 이미지 넓이/값)”) size_label.pack() size_entry = Entry(right_frame) size_entry.pack() size_entry.insert(0, “3”) watermark_var = StringVar() watermark_label = tk.Label(right_frame, textvariable=watermark_var) watermark_label.pack() dir_var_right = StringVar() dir_label_right = tk.Label(right_frame, textvariable=dir_var_right) dir_label_right.pack() listbox_upload_right = tk.Listbox(right_frame) listbox_upload_right.pack() tk.Label(right_frame, text=“업로드된 파일 (워터마크 적용)”).pack() listbox_watermarked = tk.Listbox(right_frame) listbox_watermarked.pack() tk.Label(right_frame, text=“워터마크 적용된 파일”).pack() watermark_position_frame = tk.Frame(right_frame) watermark_position_frame.pack() vars = {} for i, position in enumerate(‘abcdefghi’): vars[position] = tk.IntVar(value=1 if position == ‘e’ else 0) Checkbutton(watermark_position_frame, text=position, variable=vars[position], command=lambda pos=position: toggle_watermark_position(pos)).grid(row=i // 3, column=i % 3) root.mainloop() | cs |
이 코드를 Visual Code Studio 등의 에디터에 붙혀넣고, 터미널 창에
pyinstaller –onefile –noconsole xxxx.py
라고 치면 exe파일로 변신된다. 브라우저 설정에 따라 다운로드가 안 되는 경우도 많기 때문에, 직접 에디터를 사용해서 파일을 만들어 사용하셔야 한다. exe파일을 공유하려고 하니, 에러가 계속 발생해서 파일 공유는 못할 것 같다.
프로그램 실행 시 화면
이 프로그램을 실행하면 아래와 같은 화면이 뜨게 된다.
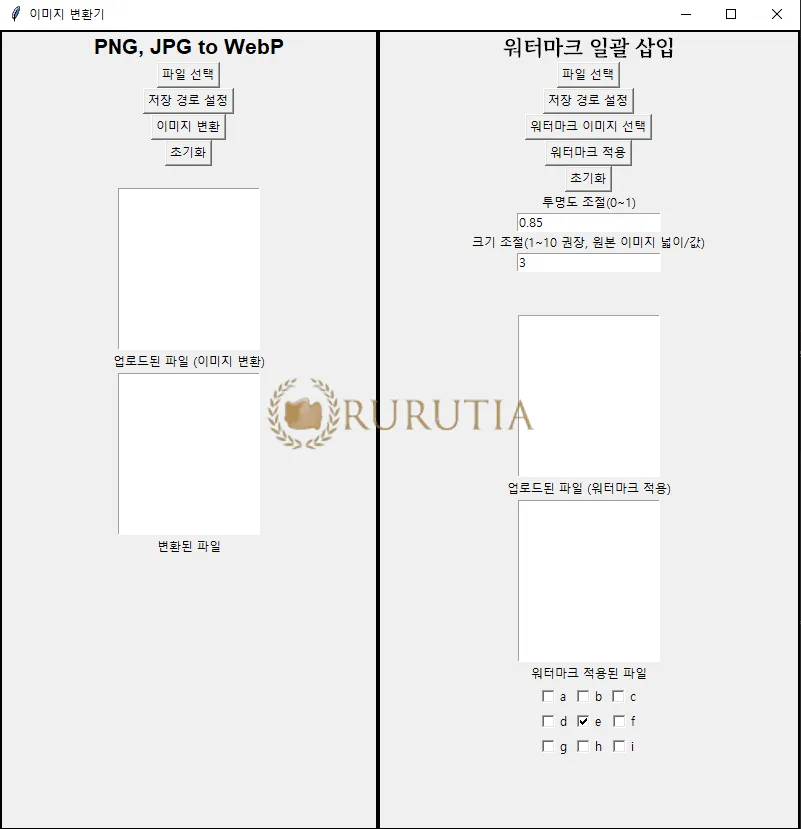
저번 ChatGPT4로 코딩하기 메인이었던 PNG JPG를 WebP로 변환하는 기능과 워터마크 일괄 삽입 기능을 같이 배치했다.
왼쪽부터 설명하자면, 파일 선택으로 png, jpg를 선택한 뒤, 변환된 파일이 저장될 저장 경로를 설정한다. 그 뒤 이미지 변환 버튼을 누르면 설정한 저장 경로 상에 webp파일이 전환되어 파일이 생선성된다.
오른쪽 워터마크 기능은 워터마크를 넣을 png, jpg 파일을 선택한 후, 워터마크가 적용된 파일이 저장될 저장 경로를 설정한다. 그 뒤, 워터마크로 넣을 png, jpg 이미지를 선택한 뒤, 워터마크 적용 버튼을 누르면 된다. 투명도는 85%가 기본으로 적용되어 있고 이를 사용자가 원하는 대로 조절할 수 있다.
‘크기 조절’은 워터마크의 크기를 결정한다. 원본 이미지의 넓이를 크기 조절에 적은 값으로 나누게 된다. 따라서 1로 설정한다면 워터마크가 매우 크게 적용되게 되고, 값이 커질수록 워터마크가 작아진다. 나는 3~5 사이가 가장 적절한 것 같았다.
그리고 abcdefghi 부분은 워터마크가 적용 될 위치를 나타내는 것이다. 기본값은 e로, 사진의 중간에 위치하게 된다. 보통 i나 h부분도 많이 사용하기 때문에 취향에 맞게 체크 표시를 설정하면 된다.(위에 언급한 코드 변경으로 위치를 사용자 마음대로 조절할 수 있음)
주의할 점은 워터마크를 넣게 되면 기존 파일이나 워터마크 파일의 확장자에 상관없이 결과물은 png파일로 출력된다. png파일은 용량이 큰 편이므로, 바로 왼 편의 webp 변환기를 통해 용량을 줄이도록 하자.
결론
궁금한 점 있으면 댓글로 적어주시길 바랍니다. 진짜 파이썬 코딩만 제대로 하면 못 만드는 프로그램이 없겠구나 라고 다시 한번 느낀다. 물론 나는 GPT가 만들어주는 코드만 읽고 이게 맞는 지 틀린 지 정도만 확인할 수 있는 수준이지만.. 이 글이 누군가에게는 도움이 되기를 바라면서.. 끝.


![Read more about the article [세법] 자녀의 해외 교육비, 증여세 대상이 될까요?](https://rurutia.co.kr/wp-content/uploads/2024/02/kk-300x169.webp)